

How To Add An Image In Premiere Pro
Add together a Nevertheless Prototype to the Sequence
You only recorded a voiceover at the end of the sequence, only the video runway is currently empty. To provide a visual background for the voiceover, you'll add a photograph of a bus and also add a title that reflects the voiceover and animates into the scene for additional visual involvement and emphasis.
Create a title to superimpose over the image
Create a new title using the text of the script. It will appear over the epitome of a bus that you'll add shortly. Because you've created several titles by now, this should be a familiar task:
- Name the title bus time.
- Paste the title text into the title, and format information technology to fit within the Safety Championship margins.
- Use the Title window tools and settings to format the text for readability.
When you're done ( Figure 4.7 ), close the Title window then that yous can set the image that will display under the title.
Add a still paradigm
You can add a still image to a sequence the same way you've added video, audio, and titles: past dragging it from the Project panel or a bin into the Timeline console. Every bit with nigh photos, the aspect ratio of the image is different from the xvi:nine video frame. Fortunately, information technology'south easy for y'all to resize and reposition the image anywhere in the frame.
-
Drag the file passenger vehicle.jpg to the end of the sequence in the Timeline console.
The nonetheless image comes in using the Still Image Default Duration specified in the General panel of the Preferences dialog box in Premiere Pro, and then you'll need to suit the elapsing.
- Drag the Out point of the passenger vehicle image to make its duration friction match the voiceover audio.
- In the Programme Monitor, double-click the bus image. Handles should appear on a bounding box around the image.
-
Drag a handle to resize the image so that it fills the frame without any black bars on the sides ( Figure 4.8 ).
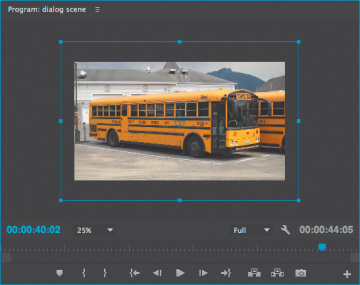
Figure iv.eight Handles for resizing a still image in the Programme Monitor
If y'all don't see bounding box handles and you see only the center of the charabanc, the image is probably much bigger than the frame and its handles are probably outside the frame. This is normal considering digital camera images usually contain many more pixels than fifty-fifty an Hard disk drive video frame. To gear up this, go to the Programme Monitor and choose a low magnification such as 25% or ten% then that y'all can encounter the surface area outside the frame. This should make the clip handles visible. At present you can drag a handle to fit the image in the frame.
Some digital cameras tape frames with a three:2 aspect ratio; others record frames with a 4:three aspect ratio. Images with those aspect ratios will need to exist recomposed to fill up a 16:9 Hd video frame without black bars on the sides. A few cameras permit you select a 16:9 aspect ratio.
Ready the championship to crawl left and concur
Now it's time to add the title over the motorbus image.
- In the Project panel, find the autobus time title you created and elevate it to the Timeline panel into a rail in a higher place the autobus image.
- Adjust the title's In betoken so that it starts a couple of seconds after the bus image, and drag its Out indicate to end when the voiceover and bus image end.
- Double-click the title to open it.
-
Cull Title > Coil/Crawl Options. Select the Crawl Left and Start Offscreen options, enter 150 in the Preroll option ( Figure 4.9 ), and click OK.
The options y'all see in the Curlicue/Crawl Options dialog box operate as follows:
- The Crawl Left choice animates the title from correct to left
- The Start Offscreen option positions the title beyond the right edge of the frame then that the crawl brings information technology into the frame
- The 150-frame postroll finishes the crawl 150 frames earlier the end of the title duration so that it holds for 5 seconds (5 times 30 frames per 2d).
Play back the sequence and meet if your results match the instance in the tutorial video; make any adjustments as needed.
Blur the background at a specific time
Although the title works, it'southward hard to read over the visually decorated double-decker photograph. Yous'll fix this trouble by blurring the double-decker photograph. Yous can employ video effects to still images.
-
Find the Fast Blur video effect by searching for information technology or choosing it from the Video Effects > Blur and Sharpen group. Elevate Fast Blur from the Effect Controls console and drop it on the bus.jpg image in the Timeline panel ( Figure iv.ten ).
- Motility the playhead to the time when the title is near to come up to a cease.
- In the Effect Controls console, brand certain the double-decker.jpg tab is agile, and expand the Camera Mistiness options.
- Immediately to the left of the Blurriness option, click the Toggle Animation stopwatch so that it's blueish.
-
In the Blurriness option, type 100 and printing Enter or Return ( Figure 4.11 ). You can apply a petty more or less blurriness if you like (the value can go above 100).
Observe that the Add Keyframe button becomes selected, because irresolute a value when the Toggle Animation stopwatch is on automatically adds a keyframe at the playhead.
- Move the playhead to the get-go of the bus.jpg image. In the Effect Controls panel, set Blurriness to 0.
Play back this function of the sequence. The title should slide in from the right equally the motorbus image becomes blurry, and the title should end and hold in the centre of the frame five seconds earlier the bus prototype ends.

How To Add An Image In Premiere Pro,
Source: https://www.adobepress.com/articles/article.asp?p=2474239&seqNum=6
Posted by: grantbance1994.blogspot.com
0 Response to "How To Add An Image In Premiere Pro"
Post a Comment